Repairing Headstones
A variety of techniques for repairing headstones was observed during this project. Some were very good; others were very bad. By sharing the ideas and experiences of other people, perhaps this web page will lead to more repairs being done as well as better choices in how repair projects are carried out.
Sample photos (sizes much reduced) and commentary are used here to illustrate both good and bad repair techniques. At the bottom is information about selection of materials and tips for mixing concrete.

|
|
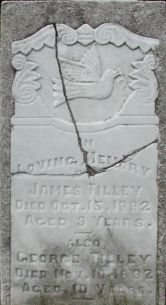
This repair was accomplished by "gluing" a broken stone back together with mason's mortar. Not only is it the worst way to repair a stone, but it is widely popular throughout Newfoundland. Sadly, the individual who was ambitious enough to do the work, ruined the face of a beautiful old stone.
From an engineering perspective this repair technique is poor because the joint will fail again when lateral force applied to the stone subjects the mortar to tensile stresses. Concrete is only strong under compression. Steel rebar is typically used to carry tensile loads. This repair could easily break again in the same place when pushed on by a person or by heavy snow piled against it.
Another error in this repair is not masking off the face of the stone to protect it from mortar. George Peckham's year of death is completely covered and unreadable.
|

|
|
A metal plate was bolted to the back of this stone to hold the two pieces together. The left side of the photo shows the face of the stone, and the right shows the plate attached to the back. Although this particular repair appears to have lasted a number of years, it is not a recommended repair method. Installing the bolts can cause the stone to be broken again. A fundamental problem with the use of bolts is that they create a region of high stress in the stone that can immediately or eventually cause additional damage.
|

|
|
Epoxy was used on this stone. It was found in the Belvedere Catholic Cemetery in St. John's where vandalism is high, and a large number of stones had been repaired this way. Judging by the quantities used in those repairs, it was probably an industrial grade of epoxy purchased in large containers at a reasonable price. Attempting a repair using small tubes of epoxy would be expensive.
Working with epoxy can make a big mess of the stone if precautions are not made to mask it off. If possible, lay multiple stone fragments face-up on a flat plastic-covered surface prior to gluing. Exposure to the sun will break down epoxy over time, although that which is sandwiched in the crack of the repair is fairly well protected from the sun.
An important consideration before using epoxy concerns the quality of the edges of the stone that are being rejoined. The epoxy may become "as hard as a rock", but is the old headstone "as hard as a rock"? Does it appear that the stone failed because of physical damage from impact, or from a general weakness of "rotting stone"? (See the page on Death of a Headstone for more information on this problem.) If the edges of the stone are like a sugar cube and flake off when rubbed, glue is useless because the stone will soon break again. Stones broken due to physical abuse are better candidates for epoxy.
|
 |
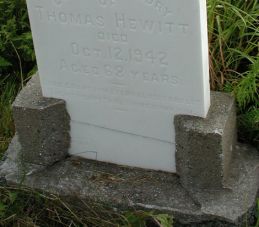
The pieces of this stone were set in a fresh bed of concrete, sort of like tiling a floor. Although not obvious from the photo, the surface of this one was raised at a steep angle from the ground. This provided good drainage, lowering the opportunity for water to collect, freeze, and cause further damage. This is an excellent repair technique for a stone with multiple fractures. The individual who performed this repair was careful to mask off the face of the white stone to protect it from the inevitable splashes of gray concrete. This fine repair job gets high marks!
|
 |
This is one of several fine repairs completed by someone at "Barr'd Island, Fogo Island". It looks as though a lot of thought when into planning the concrete forms, protecting the face of the stone, and carrying out the repair. The individual was obviously skilled with concrete. The finished product provides excellent support and drainage for the stone. The only drawback with this repair is the level of difficulty.
|
 |
This stone had a single horizontal break across the base, the most common place for failure. The repair technique is similar to the one above, and the same individual probably performed the work.
|
 |
A blue ribbon goes to the person who originated this idea. This technique was observed in several cemeteries around Newfoundland. This method is excellent for several reasons: It does not cause any additional damage to an already damaged stone, it should be mechanically stable for a long time, the stone will drain well, the cost of materials is low, and best of all, it is simple enough for any handyman. The only difficulty might be finding aluminum stock with a slot equal to the stone's thickness.
Notice in the photo that this was the second time this stone was repaired. The failed repair appears to have been with mortar mix.
|
 |
This is the same technique illustrated in the previous example, but with two slight modifications. Apparently the repairman was unable to locate aluminum stock of the appropriate dimensions, so an additional aluminum strip was used to shim the gap. Also a horizontal crosspiece was welded to the back to tie the sidepieces together. This is a complication worth avoiding, especially if heavy gauge aluminum stock is used on the sides.
Some tips about carrying out this repair technique are offered below.
|
Tips on the Repair Process & Materials Selection
To perform the "blue ribbon" repair technique shown immediately above use heavy gauge aluminum stock. Cut the stock long enough to cover the straight edges of the stone plus at least 8 more inches to extend down into the concrete base. Place the aluminum stock along the edges of the stone pieces and bind it all together with bungee cords. Mask off the exposed surfaces of the stone with plastic to prevent contamination with wet concrete.
Dig a broad flat-bottomed hole at least eight inches deep for the new concrete base for the stone. The dirt at the bottom of the hole should be "undisturbed" and well packed to prevent the stone from overturning with the passage of time. Do not throw loose dirt back into the hole!
Now prepare some "ready-mix" concrete to go into the hole. A typical bag contains less than one cubic foot, so you will probably need several bags. The biggest mistake made with concrete is not mixing it properly. If you don't mind if your new base resembles the following picture in about 20 years, then stop reading here.
|

|
|
"Concrete" is an aggregate compound made by mixing a gray powder known as "Portland Cement" with water, gravel, and sand. The relative proportions of each of the four components including the water, determine the final curing strength and life of the end product. The relative proportion of sand to gravel has been carefully determined through laboratory testing, so don't be tempted to thrown in an extra shovel full of sand. The Portland Cement is the "glue" which holds it all together. The curing of concrete is a slow process in which the water mixed with the Portland Cement combines with it over a long period of time. In fact, it takes 30 days for concrete to cure to 90% of it ultimate strength and 100 years to reach its ultimate strength! Then it begins the slow process of breaking down. The point of this information is that because the cement and water chemically combine, if too much water is added to the initial mix, the ultimate strength and watertightness of the final product will be degraded. Porous concrete more susceptible to the destructive affects of Newfoundland's deep-freeze winters.
Tips for buying and mixing concrete: Be careful not to purchase "cement" that contains no sand and gravel, or "mortar mix" that contains sand without any gravel. Instead buy the bags of "ready-mix concrete". These bags already contain the cement, gravel, and sand in the correct proportions. Slowly add the absolute minimum amount of water necessary to make a thick plastic mix that will not "flow" under the force of gravity.
With the stone standing on its two aluminum legs in the hole, shovel in the freshly mixed concrete. Use a level to square up the stone and brace it as necessary. Trowel off the top of the wet concrete to give it a neat professional look. After an hour cover the fresh concrete with plastic to prevent the surface from drying out. Concrete does not get hard by "drying"; it must "cure" in the presence of moisture. Therefore it is important to keep the concrete damp while it is curing. Give the concrete at least three days to cure before tampering with it again or removing any forms that were constructed.
|
|